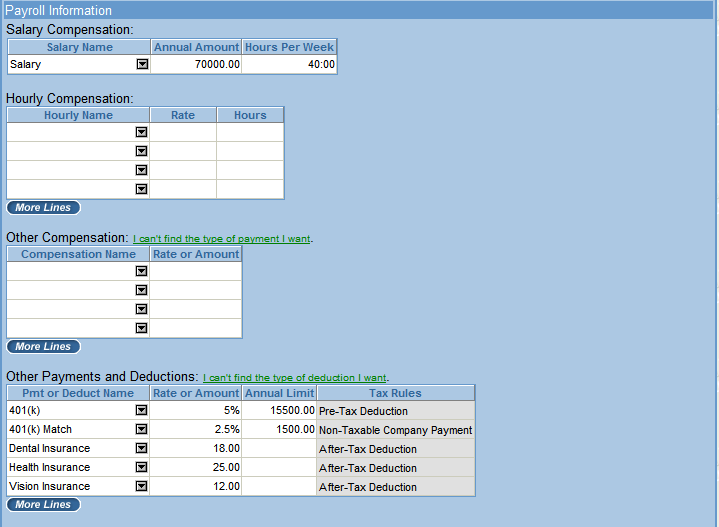
Payments/ Deductions Tab:
Past Design
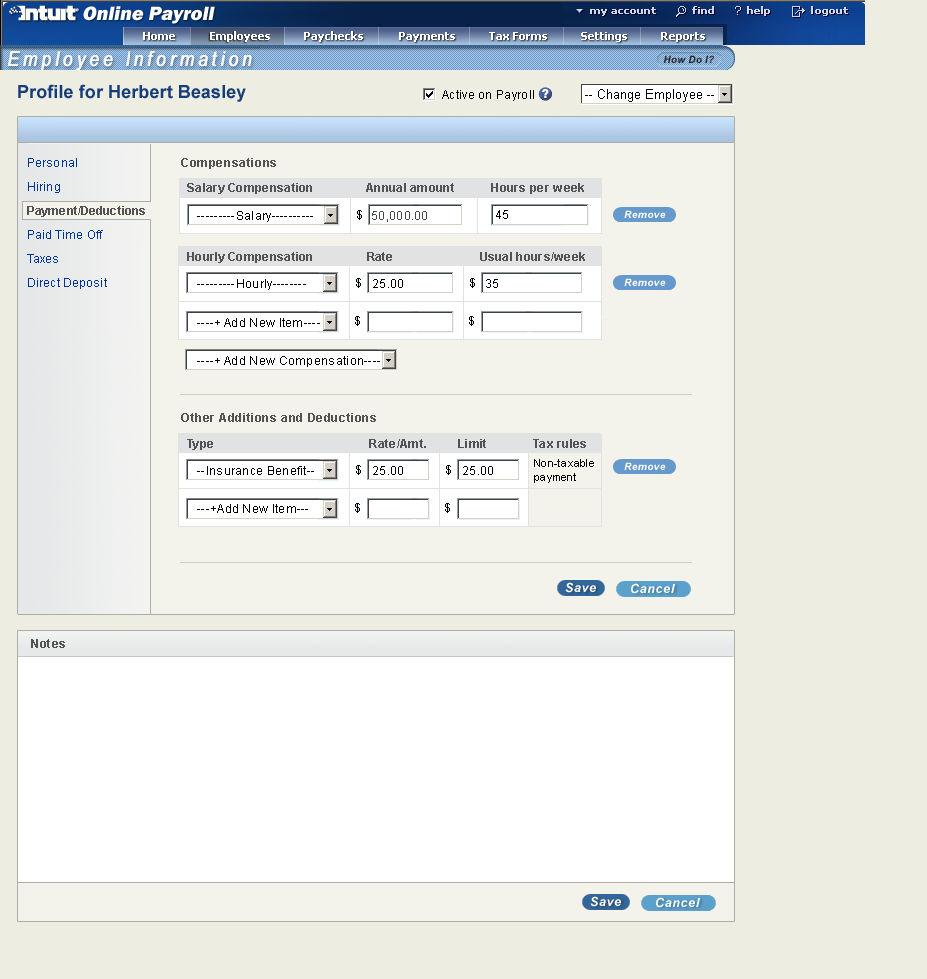
New Tab View: correct visual design; wireframes should follow this convention
General Overview of the Design
- The Payments/ Deductions Tab (formerly called Payroll Information) is unique to each employee on payroll.
- There are several wizards external to the Tab, which facilitate the adding of new types of payments and deductions. These types can be implemented with any employee on payroll.
- The tab provides a highly customizable UI to facilitate the breakdown of employee payments and certain deductions. In most cases, an employee will have only one or two payment items (Hourly and Overtime combined or Salary by itself are both typical cases), but the dynamic design of this tab allows for edge cases, where up to four compensation and deduction types can be used:
- Hourly Compensation
- Salary Compensation
- Other Compensations
- Other Additions and Deductions
- In terms of display order, Compensation types, when present in the tab, ALWAYS display in the order specified above. The full order, top to bottom, is Hourly Compensations table, Salary Compensations table, Other Compensations table, Add New Compensations button (present unless all compensation types are present), Other Additions and Deductions tabe, and Set up Other Additions and Deductions button (present only if Other Additions and Deductions are NOT present).
- Each Compensation type has a number of item types within it (Cash Advance, for instance, is an item type within the Other Additions and Deductions Compensation Type). These show up on the tables as rows.
Component Guidelines
Compensation and Deduction Tables:
- Adding and Removing Rows

- Adding a Row to a Table: Selecting an item type from the drop-down in the last row of a Compensation or Deduction table, populate the field the name chosen, then automatically adds a new blank row to the bottom of that table.
- The addition of the row would cause a drop-down animation, of approximately 1 second, to draw the user's attention to the line addition.
- There is a unique situation, where there can ONLY BE ONE row in Salary Compensation.
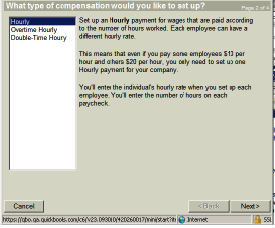
- <<Add New>> Wizard: Choosing "<<Add New>>" in a row's Add New Item pull-down will take the user to pre-established Wizard to add a new item to the pull-down that is not currently listed and return them the user to the Payments/ Deductions tab when the process is complete.
- There is a unique Wizard for each of the Compensation and Deduction types (essentially a Wizard for each table).
- The Wizard floats front and center above the screen and walks the users before a series of steps before disappearing and returning the user to the tab.
- Wizard uses existing behavior.
- Here is a picture of one of the Wizards:
- Removing Rows: rows are removed from the tables by hitting the Remove button to the right of a payment item; no warning prompt is issued. The row will disappear and all rows below the removed item will move upward. If the last used row in a table is deleted, the entire table will disappear. Tables can always be added again through the Add New Compensation pull-down of the Set up Other Additions and Deductions pull-down, but their past contents will not be stored in memory.
- There is a unique situation, where a remove button is not be present, which relies on the principal that there must always AT LEAST ONE Hourly Compensation Item or Salary Compensation Item. For example if there is no Salary table and only one item in the Hourly table, that item would not have a remove button. The rationale here is that an employee must be paid somehow, else they are not an employee.
- Undefined rows do not have a Remove button.
- Text Entered in the Compensation Table Fields
![]()
- Field behavior is the same as existing application.
Controls for Adding and Removing Tables:
- New Compensations pull-down
![]()
- When a compensation is chosen from this pull-down and active on the screen, that Compensation type no longer shows in the pull-down.
- The pull-down disappears when all Compensation tables are present on the screen, and reappears if any tables are deleted.
- If a Compensation table is deleted, it's type returns to this pull-down, to be re-added by the user at any point.
- Compensation tables, if deleted, are not remembered by the program, so that a new compensation type is re-added after previously being deleted, it will be default to an empty state (similar to Step 1 in the flow).
- Set up Other Additions and Deductions button
![]()
- The button remains until it is clicked and an Other Additions or Deductions table is added to the tab.
- The button returns to the bottom part of the tab, if the Other Additions or deductions table is deleted.
Use of Horizontal Rules
- Lastly there are two division lines in the tab at all times:
- The first one is below the Compensation table(s) and/or Add New Compensation pull-down.
- The second one is below the Other Additions and Deductions table or button, and rests on top of the Save and Cancel button area.
- Both division lines feature small gaps between the edge of the tab and the edge of the division line, so is not completely visually separate the sections of the tab.
Adding and Removing Components effects on the Tab Layout:
- Adding or removing a row causes the size it increase or decrease accordingly
- Minimum height for content area is 485 pixels.
Typical Interaction Flow:
Step 1. Adding An Hourly Compensation Type (Default Tab View)
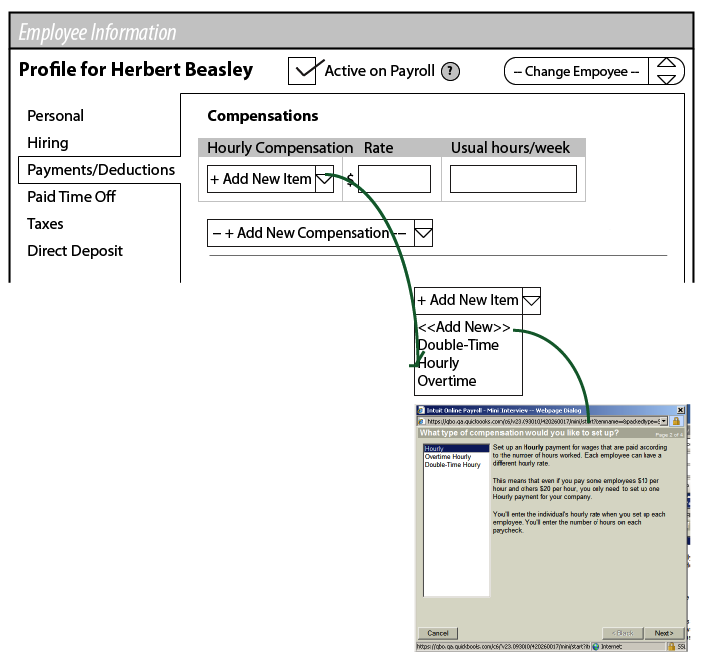
- In the above flow, a user clicks on the Add New Item pull-down within Hourly Compensation table, and chooses Hourly.
- Note the line coming out from the text "<<Add New>>" within this pull-down. This shows a wizard that a user would be confronted with if they needed to add a new type that wasn't previously available. This wizard would pop-up front and center over the screen, as it does in the previous design. For now, ignore this path--we will add an Hourly Item instead.
Step 2. Defining Hourly Compensation Specifics, Adding Salary Compensation Type
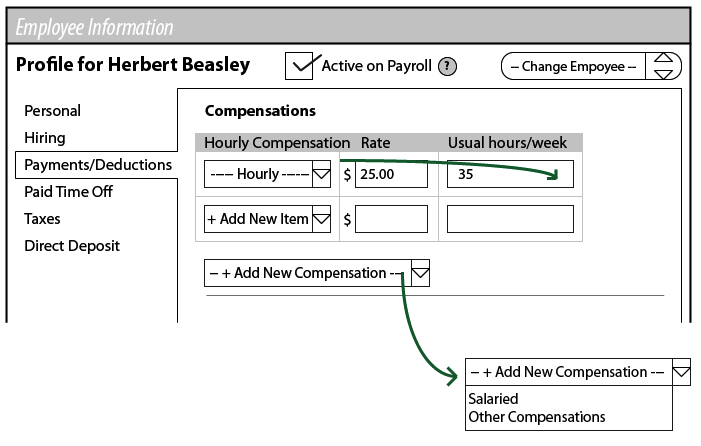
- With Hourly chosen as a type of Hourly Compensation, a blank new row shows up below it automatically in the Hourly Compensation Table.
- Back to our flow, the user types in the Rate of "$25.00," afterwards tabbing or clicking into the Usual hours/week text field and entering a "35" hours.
- Next, the user clicks on the Add New Compensation pull-down and chooses Salary.
Step 3. Defining Salary Compensation Specifics, Adding Other Compensation, Removing Hourly Compensation

- User defines the specifics for Salary. Notice how a blank row is not added to Salary (as mentioned before, Salary can only have one line item at a time).
- After the adding of Salary Compensation, Hourly Compensation displays a Remove button to the right of it's highest row (this step is not shown above).
- The user then clicks the Remove button to remove Hourly Compensation completely (this step is also not shown above).
- As a result of this operation, Salary Compensation loses it's Remove button (this step is reflected in Step 4 below).
- Next, the user chooses Other Compensations from the Add New Compensation pull-down.
Step 4. Defining Other Compensation Specifics, Adding Other Additions and Deductions
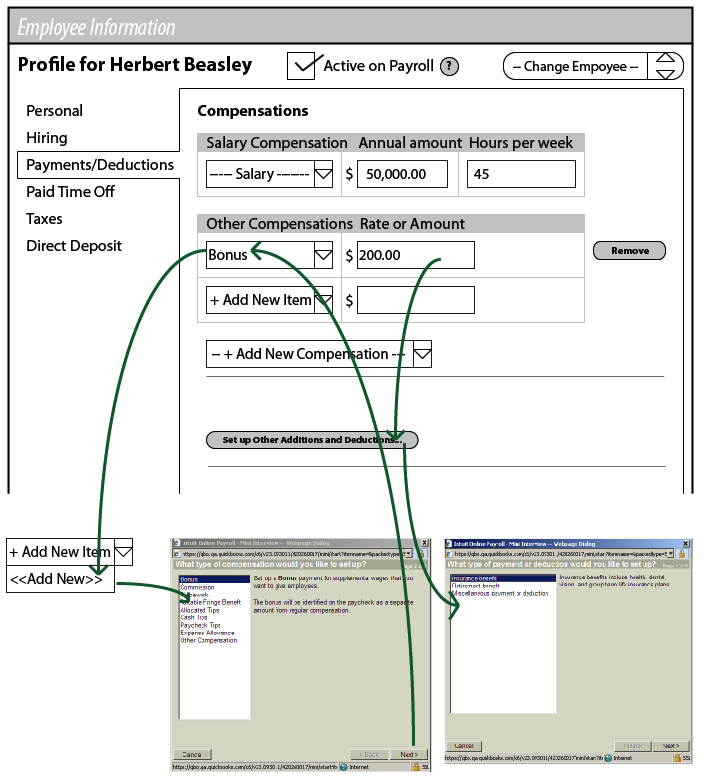
- From an empty Other Compensation table, the user clicks on the Add New Item pull-down in the top-left and chooses "<<Add New>>." The user is taken to an external Wizard, where they choose the item, "Bonus," and go through the pre-defined steps to add it to the table.
- The user fills out the remaining specific for a Rate or Amount for the Bonus row.
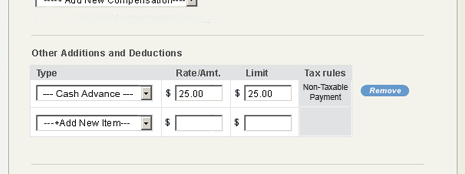
- Next, the user moves down to the bottom of the tab and clicks the Set up Other Additions and Deductions button. The user is taken to another external Wizard, where they choose the item, "Cash Advance" and go through the pre-defined steps to add it to the table.
- The Set up Other Additions and Deductions button disappears.
Step 5. Removing Other Compensations, Re-adding Hourly Compensations, Defining Other Additions and Deductions Specifics.
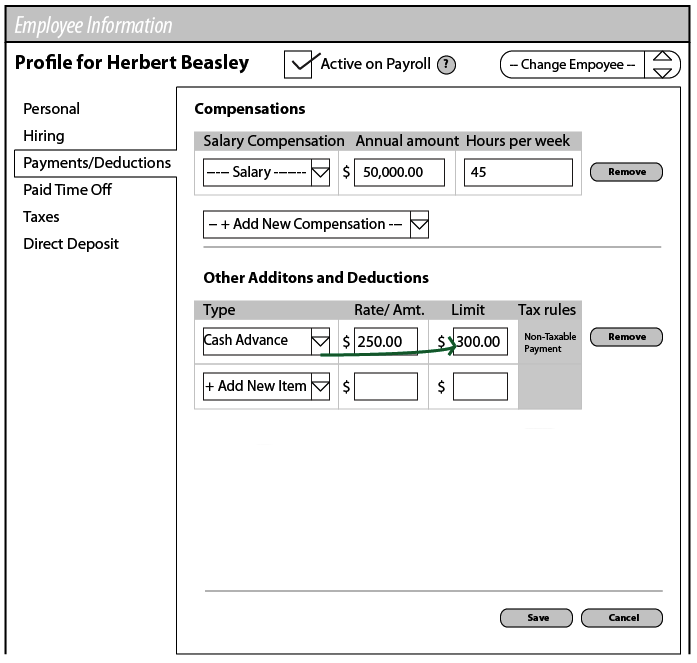
- Next, the user enters the remaining specifics for the row, Cash Advance.
- The Tax Rules field is populated based on how this it is set up for this item in the Wizard, where it was added. In the case of Cash Advance, the field displays the text, "Non-Taxable Payment."
- Finally, a user clicks Save to store all changes made to this tab.